Friday, April 8, 2016

Newsletter for April School holidays

Hello April, Where has March gone?
Easter came and went, and now we are into April and nearly the school holidays already.

Stocktake has been completed, I don't know who invented that job, but I think it would be best if it was scrapped from existence.  It's not bad enough that I have to count everything, then I have to listen as my mother and mother n law try to type up the lists, and basically decipher my scrawl.  I didn't have any problems reading it... well one or two things may have been a little hard to work out.  But the lists have been typed up, so that is awesome.

You know your getting a little predictable when Easter comes around, and the kids come over and Sammy walks in the door with Sean, and the first thing she asks is if she is getting deodorant and shampoo for Easter, cause she didnt buy any this week as she was expecting some from me.  Hmmm may have to change next Easters basket of goodies.  We haven't done Easter eggs for since the girls were little.  I always found them very expensive and gone far to quickly, and I preferred to give them a book, or as may have happened for the last few years nice smelly things.  But I do believe there might be changes next year!
New Stock

For all you Owl and birds lovers, check out this awesome stamp from Bobunny.
http://www.imagineif.co.nz/product/birds-feather-stamp/
New stamps are in from Finnabair, and Prima marketing, read to me, and music to my ears. '
Click on the link to take you to the page. 

Love these new embellishments from Prima, very blingy and very cool for layouts or mini albums and more. Click on the photo to take you to the page.                             


A versatile surface especially suited for alcohol ink and mixed media techniques. This heavyweight paper resists buckling and dries quickly. Non-porous and water resistant. It is all the rage with artists at the moment, so check it out by clicking on the photo. Now I got to see this product in action yesterday by a lady by the name of Val Stokes, oh my was I inspired.  Class idea for sure. 

This is a new Kit from us, The garden Easel.  The cost is $55.00 and includes everything except your paint.
It is a very easy project to do and with Mothers day coming up, it is a great present, you could even put a photo on it.

For a better look check out the website by click on the photo. 


Colour Blast

I am very happy to announce that we have just arrived in the range of Colour Blast from Australia.
Colour blast is an amazing product, with Embossing powders, pastes and shimmer sprays.
Now I have been playing with mixed media for a while, and I have to say this stuff is great.

The sprays are very very shimmery, and the leather one is Wow
The embossing powder adds a really cool look to your chipboard and other embossing projects, and as for the paste, I am in heaven.  It is one of the best product I have seen in a long while.

I have put the links here for you, however we have sold a lot already, there is more coming, so check them out.


all colours come in all three products,
embossing powders http://www.imagineif.co.nz/product-category/mixed-media-products/embossing-enamels-and-powders/

Sprays http://www.imagineif.co.nz/product-category/mixed-media-products/sprays-and-mists-stains/colour-blast-shimmer-sprays/

Pastes
http://www.imagineif.co.nz/product-category/mixed-media-products/cremes-pastes-rubs/

https://www.facebook.com/Colourblast1/
 
School Holiday Program for April

Tuesday April 19th -   1pm - 3pm $25
Painting class with Alysha, this is not a slap the paint on class, this is a learning class, mixing colours, adding texture, and learn how to blend your paint properly. All done on pallet wood.

Wednesday April 20th - Fairy Ring $30 - 10am 12.30pm

Everything is cut out, so even little ones can do this.  3 little houses, clothes line, bridge, seat
surrounding a pond, lots more to add, but we ran out of time and needed a photo for you.


Friday April 22nd  Banner   10am - 12pm  $25.00
We will be making a banner with your name on it, made from Triangle shapes and covered in paper, coloured to suit your room, and then stamped designs on to the project and flowers or something else for the boys, layers and texture to make an interesting piece for your room.


Tuesday April 26th - Home sweet home with Alysha $20.00, 1pm - 3pm and you go home with your own stencil.  Maybe make for Mum for mothers day which is coming up soon. Painting, and paper and some chipboard make up this cute a4 sized project.

Wednesday April 27th - $25.00 Torso fun, 10am - 12pm
Paper lace and a torso.  This is a great project, black and white and very classic design.  Hardly any cutting so easy enough to do.


Thursday April 28th  Puppet fun 10am- 12pm $25.00, this little guy is a real cutie and walks and dips and dives around.  Easy to do for little ones.


Friday April 29th Cup Cake decorating class $25.00  10am - 12pm
Cupcake decorating with Cheryl.  You will decorate 6 cupcakes, two will be piped, two you will learn to use cutters, and the other two will be sculptures.  This class is great for the little cooks who want to learn some good techniques.

Don't forget we also do Birthday parties.  Please book soon to guarantee your childs place.
We have left spaces to put on double ups of classes if required. But we only have so much of each product.

078897838 for bookings or email us imagineif@xtra.co.nz

 
Well that's it, we have lots of new classes for term 2, including a shadow box, another 9 pages class, more cake decorating and more.  Next newsletter for all new classes and dates.
Have a great week
Jo and the team at Imagine If...

Monday, April 4, 2016

Altered Paintbrush using Twiddleybitz Chipboard - Ngaere

This week I have been working on altered Paintbrush using Twiddleybitz chipboard from Imagine If.

Here is the finished project:


I began with a paintbrush which I covered with tissue paper and then painted with acrylic paint.  I used brown, blue and white paint to get a verdigris patina effect on the paintbrush and on the chipboard.


I used some small cogs, a gorgeous steampunk butterfly and a banner from the Twiddleybitz range as well as some metal cogs and clock hands, a prima clockface and a small metal handle.


Here are the assembled and painted chipboard pieces.


These were attached to the paintbrush and I added some more metal cogs on the butterfly and some cogs and clockhands as charms to hang from the bottom of the paintbrush. I threaded a ball chain through the top of th paintbrush added a metal gear and the piece was finished. This was such fun to make and the Twiddleybitz chipboard is just gorgeous with such fine and intricate cuts.   I hope you will check out the range that Jo has on offer over at Imagine If. And check out the blog to see what the other Design Team members have been up to and catch up on the news from Jo.


Summer Art Journal Page with Sharon

Hi everyone

Hope you have all been enjoying a summer break ( although I think at times we all need a break from summer with these hot temps we have been having!)

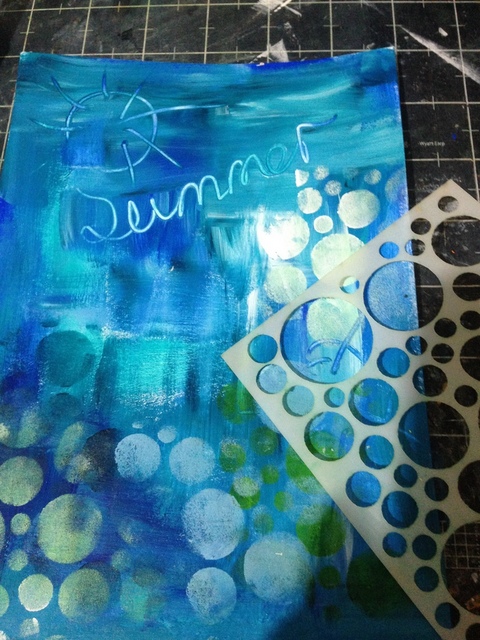
I have been playing in my art journal this week, and am going to share with you my art journal page "Summer" .  These are the three Imagine if stencils I have used in the making of my page.


The first step is to create a back ground using a variety of acrylic paints, scratching some designs into the paint while wet ( Sometimes, I make my art journal pages on smooth white card, and then glue that into my album ....this is what I did this time ) I have used  various shades of blues and aquas.

Next choose a stencil and using a sponge apply colours to suit on top of the dried back ground. Alter the colours around the page to create depth of colour

Highlight some of the circle shapes using either a white journal pen, or a paint applicator which creates fine lines. 


After the last step has dried, add the circular stencil in the top corner using a bright yellow.....to sort of represent the sun, and then stencil the girls face using a dark colour. ( I used indigo) Once this is dry, shade around the jawline with a black gelato, and smudge to fade out. 

Using a fine paint brush or applicator squiggle some aqua "waves along the base. Use indigo paint to add cross hatches, and "smoosh" around the edges to create a rustic border. Also paint the lid of a spray bottle and stamp random circles in the dark colour.
                                                    

Finally add some red gelato like "lippy" to the  lips, and using a damp cotton bud, spread to fill in the lip shape.
Type out some journalling on coordinating scrap of paper, and adhere to the page. Add another touch of red in the form of a gauze heart to introduce another touch of the red.

Thanks for looking.

Cheers
Sharon

Birdcage Canvas with Tracy

Hello, today I want to share a canvas I created that has a neat little bird cage on it so its quite a 3d canvas. I just knew I wanted to use the birdcage it was just a matter of putting on my brave face and cutting it in half so it fits flat on the canvas. So first used I used Gesso on the canvas to prime it, then place my chipboard elements on it. As you can see from the photo below I only had a few on it, then decided to add more until I was happy, but these were the main elements - Branches, Birdcage and of course those cute little mushrooms.
Before sticking everything down I used circle template and texture paste to give background a little bit of interest. After placing gesso over everything I then mixed up two spray bottles of colour, one using Art Ingredients Mica Powder - Copper and Art Ingredients Mica Powder - Teal.
After spraying colour and allowing time to dry I then sprayed whole canvas with Matte Medium mixed with water to set the colour so it doesn't rub off.
 And a few close ups....
Hope you enjoyed looking at my project and maybe even gave you a little inspiration. Mixed media is so easy and fun to do,,,, if you haven't done canvas I highly recommend you give it a go! Until next time,,, happy crafting. Tracy
Items used
Chipboard Birdcage
Chipboard Mushrooms
Flowers