| |||||||||||||||||||||||||||||||||||||||
|

Sunday, December 13, 2015
Merry Christmas 2015


Saturday, December 12, 2015
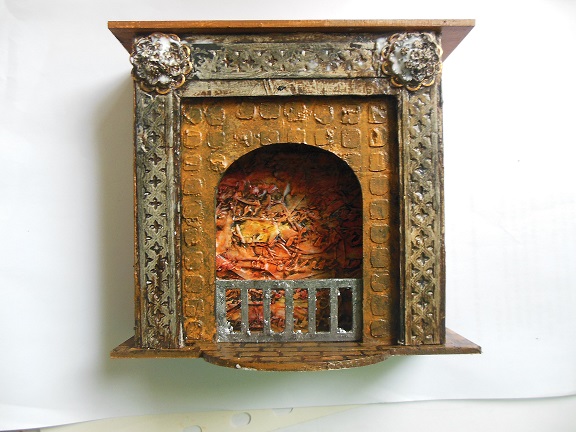
Hearth and Heart By Ngaere
One of the latest products that Jo at Imagine If has come up with is a cute little 3D MDF fireplace. You may have seen the gorgeous finished fireplaces that Tracy and Sharon have already posted on the Imagine If blog. If not pop over and check them out. I racked my brain long and hard trying to come up with a concept for this piece. When I craft I need to "see" the project in my head before I can begin crafting and for a while it just was not happening. In my kit from Jo I also had a set of the Prima "relics" and a light bulb went off in my head while I was looking a them and I thought "the hearth is the heart of the home" and it fell into place. Rather than having the fireplace freestanding I wanted to be able to display it somehow so I found a shadow box from an unfinished project and decided to recycle it for this project.
Here is the finished project and the explanation of the processes I used to create it.


I also used tissue paper and texture paste on the heart and on the recycled shadow box.


Once the paste and the gesso had dried I added colour to the wings and the top of the heart by painting them all with gold paint. When the gold paint had dried I brushed on and wiped off black paint. To finish I painted the edges of the wings and the flames with soft gel medium containing red glitter. The heart I did in the same way except I painted it red instead of gold.


To finish the heart I added some embossing powder, copper micro beads around the top and clear micro beads in the niche. I then added red gems around the neck of the heart and outlining the niche.

Once the fireplace had dried I painted the faceplate with brown paint, then black and wiped off the black paint to give an antique look. I did the same with the brickwork using yellow ochre and black paint.


I painted the heart the same colours, I just added a little bit of black to the mix and then O stanped it and the sides with a brickwork stamp. I then assembled the fireplace.


Here is the finished project and the explanation of the processes I used to create it.

First I covered the MDF with white gesso on both sides. This seals the pieces and stops the paint and mediums from soaking into the MDF.

I also painted the Prima Relic pieces with white gesso.

I took the face of the fireplace and glued on some tissue paper for texture and added some Dresden Trim. metal embellishments and a couple of resin flowers.

I traced on the front of the fireplace where the faceplate would site and using texture paste I added some "brickwork" into the area not covered by the faceplate. For the back of the fireplace I covered it with tissue paper and then I used texture paste through a text stencil for added dimension.


I also used tissue paper and texture paste on the heart and on the recycled shadow box.


Once the paste and the gesso had dried I added colour to the wings and the top of the heart by painting them all with gold paint. When the gold paint had dried I brushed on and wiped off black paint. To finish I painted the edges of the wings and the flames with soft gel medium containing red glitter. The heart I did in the same way except I painted it red instead of gold.


Once the fireplace had dried I painted the faceplate with brown paint, then black and wiped off the black paint to give an antique look. I did the same with the brickwork using yellow ochre and black paint.


For the background I painted the piece with red, yellow and orange, then again covered with black paint and wiped most of it off.


For the sides I covered them with book paper and painted them with yellow ochre brown and black paint. The grill I painted with black gesso and then I gave it a thick coat of Lumiere Pewter paint to give it a rough metal look.

For the mantelpiece I used the same yellow ochre and brown paint and brushed it on in long stokes so it looked a little like wood grain.

I painted the heart the same colours, I just added a little bit of black to the mix and then O stanped it and the sides with a brickwork stamp. I then assembled the fireplace.


Once the fireplace was assembled I glued the heart and wings to the front of it and added the little bust into the niche.

I painted the shadow box in the same colours I used for the background, added some trim, chipboard letters and a few embellishments and the piece was finished.

I am really pleased with how this piece turned out and I hope it inspires you to try something a bit different with the gorgeous MDF fireplace from Imagine If. If you do note feel like the fireplace is the right piece for you then check out some of the amazing products Jo has for sale on her website. Until next time, Happy Crafting.
Wednesday, December 2, 2015
Tracy's Christmas Chimney
Hi Tracy here, I love Christmas!!! So imagine my delight when I got some Christmas product in my Design Team kit. Figuring out what items to use was the hardest thing but once an idea formed it was all glue, paint, glitter and mess for the day!!!

So of course I painted up the amazing MDF Chimney and used Stencil Bricks pattern over it using brown paint mixed in with texture paste. I also added white texture paste and glitter to chipboard that looks like snow fall. Lastly I added textured candles and tree. My girl has already claimed this for her room, so I will get a little fake battery candle to go inside chimney to light up for her.

Items from Imagine If used
MDF Chimney
Snow line
Tuesday, December 1, 2015
Fireplace Off the Page with Sharon
Hi everyone. Hope your crafting is keeping you busy in this "silly season"
Today I am sharing with you an MDF project which is a "fireplace".
I have created a wee fireplace assemblage, which I have decorated to become part of my Christmas decoration collection.
Step One
Using a super heavy gesso, coat the fireplace surround. I used it reasonably thickly, and did a couple of coats, as I want this to be the "mortar" of my brickwork


Step Three
Using a palette knife, spread a layer of the brown gritty medium onto the surface of the fireplace surround. While this is still wet, scratch away this brown medium to reveal the white underneath. I used a skewer. You need to wipe the excess away very often. I chose to make my bricks very uneven in size and shape, to give it a more rustic feel. You could use a brick stencil and just wipe the texture medium through it if you like.


Step Five
Apply gold crackle medium to the other part of the fireplace surround. I used the viva decor croco colour and put it on reasonably thickly, then dried with the heat gun to encourage heavy cracks. I put together all the pieces and I also painted the top mantle of the fireplace with this gold for a more festive feel. ( This also covered up the joins of the MDF)

Step Six
Paint all the other edges with more of the viva decor ferro medium. ( I find it just gives it a bit of texture, and the subtle sparkle is quite cool)
I then rolled up some brown bazill cardstock, very very tightly to create logs which I stacked in the fireplace. I found it is easier to spritz the cardstock and roll tightly, gluing the last inch or so, to get a tight roll. You can ink the ends of the logs to simulate the rings of the log.
Decorate with items of your choice. I have had these puffy stickers sitting in my stash for a "month of Sundays" and they were the perfect size to hang from the mantle piece on a thin piece of string. Of course you can stand wee items on the top of your fireplace to decorate it further! And wouldn't it make an awesome part of a miniature dolls house! I could see a whole house designed around this one piece!!

Thanks for looking.
Cheers
Sharon
Today I am sharing with you an MDF project which is a "fireplace".
I have created a wee fireplace assemblage, which I have decorated to become part of my Christmas decoration collection.
Step One
Using a super heavy gesso, coat the fireplace surround. I used it reasonably thickly, and did a couple of coats, as I want this to be the "mortar" of my brickwork

Step Two
Using Coarse pumice gel or Coarse sand gel ( you can make your own with 3D gel medium and very dry clean sand added to it ) Add either brown ink to the pumice gel and mix together to get a uniform colour. I didn't have brown, so I mixed green and red together to get a good dark brown colour.

Step Three
Using a palette knife, spread a layer of the brown gritty medium onto the surface of the fireplace surround. While this is still wet, scratch away this brown medium to reveal the white underneath. I used a skewer. You need to wipe the excess away very often. I chose to make my bricks very uneven in size and shape, to give it a more rustic feel. You could use a brick stencil and just wipe the texture medium through it if you like.

Step Four
On the back piece of the fireplace, I used this viva decor ferro medium. It gives a really good metallic look, and is textured, a little like the back of a fireplace. Spread all over with a palette knife

Step Five
Apply gold crackle medium to the other part of the fireplace surround. I used the viva decor croco colour and put it on reasonably thickly, then dried with the heat gun to encourage heavy cracks. I put together all the pieces and I also painted the top mantle of the fireplace with this gold for a more festive feel. ( This also covered up the joins of the MDF)

Step Six
Paint all the other edges with more of the viva decor ferro medium. ( I find it just gives it a bit of texture, and the subtle sparkle is quite cool)
I then rolled up some brown bazill cardstock, very very tightly to create logs which I stacked in the fireplace. I found it is easier to spritz the cardstock and roll tightly, gluing the last inch or so, to get a tight roll. You can ink the ends of the logs to simulate the rings of the log.
Decorate with items of your choice. I have had these puffy stickers sitting in my stash for a "month of Sundays" and they were the perfect size to hang from the mantle piece on a thin piece of string. Of course you can stand wee items on the top of your fireplace to decorate it further! And wouldn't it make an awesome part of a miniature dolls house! I could see a whole house designed around this one piece!!

Thanks for looking.
Cheers
Sharon
Subscribe to:
Comments (Atom)