Sunday, February 28, 2016

Steampunk Fireplace By Cheryl


Hi Cheryl Here,
I'm back again with my othethe same as the last project and ready to go.
I prepared the fireplace differently this time though.


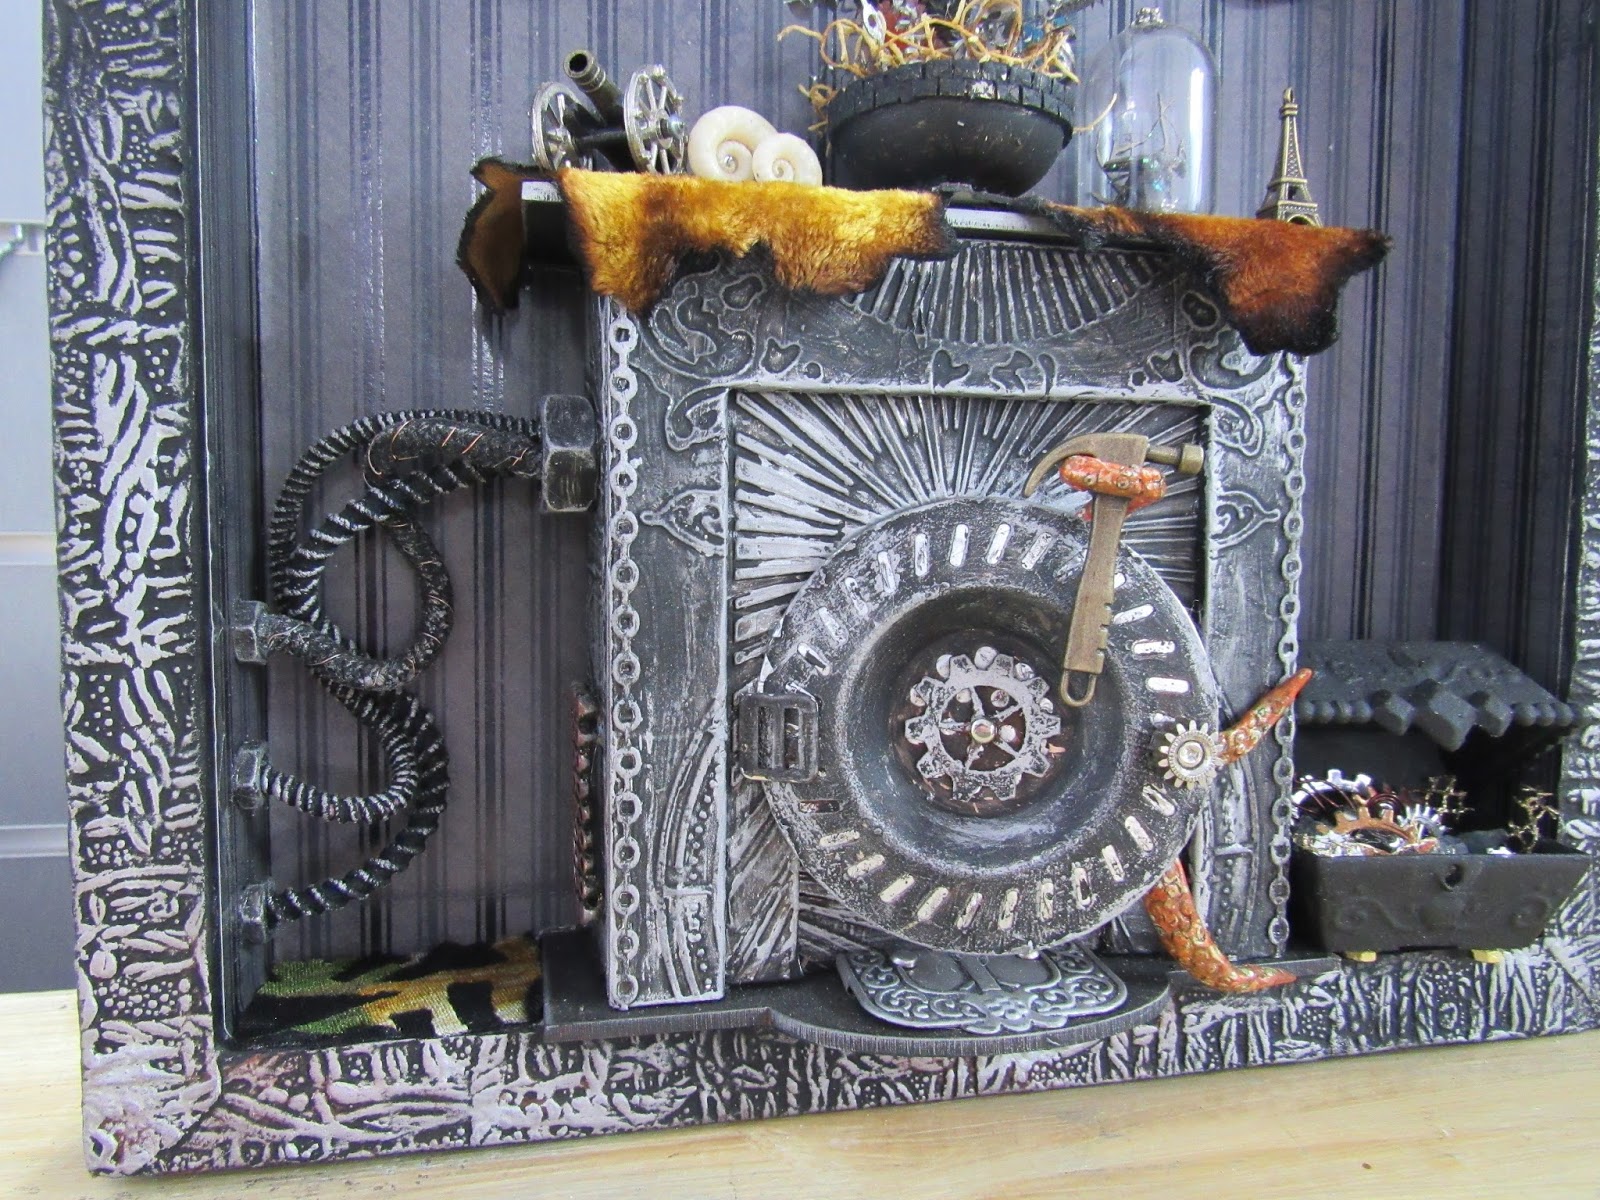
Aluminium foil tape was used on card then embossed with two different folders
(Couture creations-'Renaissance' and Craft concepts -'sun rays')
Sun rays is attached to the base of the fireplace front and Renaissance is attached to the smaller outer front of the fireplace. Black gesso all fireplace pieces and glue together with gel medium.
Chain die (memory box) in black card is attached to both sides of the fire place then it is all wiped over with 'Rub'n'buff' silver.
The left over embossed card from the 'Sun Rays' is used for the base of the steam boiler.
Boiler door is a cheap metal sink strainer with a chipboard cog and a brad  to attach them together. Cover any holes with aluminium tape. The fireplace front step is a metal embellishment out of my stash.
Air dried Clay is used to make the Octopus tentacles, then it was painted with Vintaj Patina paints and attached with glossy accents inside the fireplace opening.
White fibre fill stuffing was put in the fireplace opening for the look of steam. I took a little plastic jewellery box apart for the coal box, added some nuts to the base, black gesso-ed it and filled it with metal cogs, little stones(for coal) fuses and smaller cogs(memory box-98964)all for fuel for the boiler.


Along the mantelpiece there is a mini metal canon(from my stash)2 white rams horn shells(just like mini nautilus shells) a Steampunk floral arrangement(moss, metal filings, Guinea fowl feathers all inside a metal bell filled with florist oasis).


A Glass Dome filled with a chipboard branch and a dried Who-who bug beetle(found in a spiders web) painted with opal dust.
Lastly a Eiffel Tower metal embellishment all sit on top of a piece of yellow velvet aged with a fire-lighter to make the blacked edges. All the adornments sit on top of chipboard or metal cogs as doilies.
On the left hand side of the boiler there are assorted nuts and hair ties black gesso-ed to create electrical cables. Burnt velvet lines the floor for carpet.
Wall Decorations: left to right.
I used a metal medal painted with Vintaj Patina paints and some brass coloured micro-beads.
Bulldog with pipe stamp(Tim Holtz-'Perfect Gentleman' collection) with a clear dome epoxy sticker over the top . A nut attaches it to the wall and a metal ball chain wraps around the side.
Stag Head(Idea-ology)gesso-ed in white and coloured as for the Victorian stag.
Eye patch is made with wire and a brass nut. Necklace is a small piece of chain.
Trophy frame die(Spellbinders)   attached with mounting tape to the wall paper.
Details of the Stags face is drawn with Black Pitt pen (XS)
Viva rusty paper paint is used on the chipboard 'mini' disc viewer then aluminium tape is used behind it. Alcohol ink was dripped into the slots to colour it and a glass dome clock embellishment was glued to the front.
I again used anaglypta paper to line the outside of the frame for texture. I painted with black gesso and used the 'rub'n'buff silver again to match it all in.
I had so much fun making these projects because there was so many options. It was hard to choose. Try it yourself. The fireplace is so easy to put together and the decorating options are endless.
Till next time.
Relax, have some fun and remember to put some crafting into your day.
Cheryl Owsley

Sunday, February 21, 2016

Newsletter for end of February new classes added


Hi to all, can you believe that we are nearly at the end of February, the garden has seen the most amazing growth, hubby is still outside cutting back all the extra branches and leaves that have sprouted up.  A few weeds as well being pulled although I did see him in the middle of the garden with the hedge trimmer, as if that was going to work long term!  The cat Twiggy is enjoying heaps of success at the moment, baby mice comning in every night and being let go... in front of us.... so small.  She just lays and looks disinterested, until we go scrambling to get it.  One so small it got into the bathroom and appeared to have just disappeared, it seems into a pack of sealed toilet paper, it wasnt till I went to wash the floors yesterday, I noticed that there seemed to be eaten paper in the bag.  Found that one at least.


Classes:

Weekly classes:
Scrapbooking class 10am - 12pm  Full

Card class 10am - 12pm
We have a couple of spaces in our card classes which are on every 2nd Friday $12.00 for 2-3 cards, everything supplied. 

Thursday night 6pm - 8pm
This is an open class, you can chat and craft, scrapbooking, cardmaking whatever you would like to do.  The cost is $10.00 per person unless you are doing a kit from us.

12th March 10am-12.30pm Beach painting with Aly. $30.00
This is the first of many art classes we will be bringing you.
Using old Pallet wood, as a base, you will create a painted beach scene. This is a great way to learn the basics, with Aly, who loves to play with colour, including shading and texture.  Learn to add your base, and then build up colour and shading to make your scene. The picture below is just a piece of it.


Change of date, because someone forgot about easter!
19th March 9am - 3pm 9 scrapbooking pages in one day $70.00  2 spots only left, and 3 kits!
We will get 9 pages done, with lots of techniques to get your pages done.  We will do some pretty, some grunge and some in between. If you never get around to getting some pages done, then this is the class for you. Everything supplied, except your tools, glue and tape. Photos to follow.

2nd April - Cake Decorating part 1: $25.00 10am - 12pm.
In this class with Cheryl, you will be rolling out a fondant base for cupcakes, and learning to make fondant roses, and leaves.  You will have time to make at least two of everything.

19th April School holiday program begins.

Phone 078897838 for bookings or email us on imagineif@xtra.co.nz


This is our new MDF Easel, this is the filligree version, $15.00, we also have a plain version.
Click on the picture to take you to the shop. 


Ricks new project, this MDF plane.  It is a little tricker to put together, but there are great instructions and  most pieces are labelled, 18cm x 7cm high.Click on the picture to go the the products.


This is Cheryl latest piece using the fireplace, it is one of two pieces she has done. Clickj on the picture to go to the blog. 


Tracy has made her first ever canvas for her daughter, click on the list to go to the blog.
 

New Contact Details:

Imagine If….
216 Thames street
Morrinsville 3300
078897838

 
Finally we have had our first shipment of cake decorating supplies arrive, we are just waiting on the new release of glitters and gels and then we will be set.  The cake boards and tools have been flying out the door which is great, and we have to re order all ready.

Did you know we also do gift baskets?  Yes we do those as well.  So if you are ever in need of a little gourmet gift basket let us know and we make one up especially for you.

That is it for this week,
love to see you in store, come and check out all the new products.

Stay safe
Jo


Victorian Fireplace By Cheryl


Hope you are having a great week  and squeezing some time in for all these new craft ideas. I got to play with this cool fireplace, it can be used in sooooo many different ways. I chose Victorian and Steampunk. I couldn't pick between, so I did both.(greedy, yes I know!)

I chose to use mine for wall hangings so I repurposed two wooden picture frames and used the back for these projects. Cover these with black gesso and they are ready for action.
Black gesso all parts of the fireplace & used glossy accents to put it all together.
1 12 x 12 sheet of scrapbooking paper was attached to the inside of the frame - for wallpaper.
An antique metal drawer pull(graphics 45) was used for the top of the fire place guard-black gesso-ed and gold high-lighted.
Gold Organza ribbon was attached to the top of the shelf, and a strip of lace finished it off.
A full sized metal drawer handle was used for the hearth guard. Painted to match the fireplace.


9 Candles were made(Air-dried clay) painted white and then glossy accents were dribbled down the sides to look like melted wax.
Candle Wicks (black bugle beads) and flame (gold metal sticker embellishments) finish the candles.
A scrap of Red Velvet material cut to size finished the carpet off.

Wall decorations-
Top Left-A metal embellishment has 2 decorative beads attached and a picture in a dome. Multi-coloured micro-beads finish it off.
Stag Head is gesso-ed white and painted with walnut stain and vintage photo distressed ink and detailed with a black Pitt pen(XS)
3x Bird Charms(from my stash)


The glass dome and base has a little metal man (from my stash) sitting on a rock with plastic diamonds around him.
The Vase and Glass Dome have little doilies underneath cut from crocheted lace.


The Flower arrangement is in a mini brass goblet with oasis inside painted with black gesso and decorated with gold metal stickers. Mini paper Roses and Rose-buds were used in the arrangement with plastic fern foliage and asstd Ginea fowl feathers(my favourites)
Plastic fan is gesso-ed white then dabbed with Dylusion sprays and a small paint brush.
Small china Cup and Saucer was hand-painted using a piece of florist wire and Vintaj Patina paints: Ochre, jade, rust and  black Pitt pen(XS)
Lastly I added anaglypta wallpaper(for texture)to the sides of the frame with gel medium, painted it with black gesso and dry brushed with gold paint.
Please if I've missed anything or you have any questions just let me know and I'm happy to explain how I did it.
Happy Crafting Everyone
Cheryl Owsley
P.s. There are a few items here that I have used and are available at the 'Imagine If..." store, but not on-line. This is because of the huge variety of small items that are physically impossible to list all individually. These are mini roses and rose buds, glass domes, metal embellishments(the one on the wall) and,metallic stickers.


Tuesday, February 16, 2016

Dream Canvas - DT project Tracy

Hi, something a little bit different from me this month, I decided to have a go at doing an art canvas. I am pretty sure this will be the first of many as I now have my daughters friends all wanting one!
I used a lot of elements from the Imagine If store which you will be able to see in the next few photos.

Firstly I used a brick stencil to add a bit of texture to canvas then arranged my chipboard pieces until I was happy then covered everything with Gesso

And then I got to get messy!!! using many layers of Tim Holtz Distress Paint "Walnut Stain", Distress spray stain "Twisted Citron and Ground Expresso" And then finished edges with Distress Ink "Vintage Photo"
I then used my Gelatos to highlight areas. I felt it still needed something else so that's when I added a few embellishments. Here's a couple close ups.


So I really hope you enjoyed my project and it inspired you to get your paints, sprays and stains out!!! Jo has an amazing amount of chipboard to play with the ideas are never ending!


Sunday, February 14, 2016

Newsletter for Valentines day


Happy Valentines day.

I hope you have all had a lovely day.  I was totally spoilt, hubby vacuumed up all the spiders roaming the house, he decided that was a great way of showing how much he loves me, as he knows I am not very fond of them.  Of course then he also sent me a facebook video with a spider jumping down and landing on the camera, which made me jump and he laughed, so that sort of wiped away any brownie points he had earned.
After 28 years of marriage I guess I should be used to his sense of humour by now.

Have you had a chance to check out the Senz website yet?  Tickets have gone on sale.  I believe 100 VIP tickets were sold on the first week, which is a great sign of how popular this event is.
http://www.senz.co.nz

This is one of our new products, an easel, it is a real sweetie, we have quite a few people working on this on a Thursday night at the moment.  The cost is $15.00. A couple of design team members are working on this project already, so that will be interesting.


This is another new addition to our designs, a gorgeous fence.
We have had a glitch with being able to upload pictures to the website, but hope to have that sorted this week.


Check out Ngaere;s work on the blog, just click on the picture to go to the blog. 


This is another Ngaere project, click on the photo for instructions on making this garden heart.


Cheryl has taken to an old doll and given it a new purpose, check it out, click on the picture


New Contact Details:

Imagine If….
216 Thames street
Morrinsville 3300
078897838


We have an amazing new range of flowers in stock, these add a real wow to your projects,
Check them all out, by clicking on the photo.

 
.
Classes:

Weekly classes:
Scrapbooking class 10am - 12pm
We have one permanent space available in our weekly class, let me know if you are keen to join.  Class costs are $20.00 and everything supplied for at least two pages, sometimes 3.  We do all sorts of different proejects, and use lots of differnt products, at no extra cost.  You just bring your tape and glue and tools.

Card class 10am - 12pm
We have a couple of spaces in our card classes which are on every 2nd Friday $12.00 for 2-3 cards, everything supplied.

Thursday night 6pm - 8pm
This is an open class, you can chat and craft, scrapbooking, cardmaking whatever you would like to do.
The cost is $10.00 per person unless you are doing a kit from us.

Other classes:
February 27th 9am Moment by moment Gate fold book: $70.00 with Jo  all day class.
This book has been designed to give as a gift for a wedding or for mothers day or just because you want to.  It uses Provincial paper from Kaisercraft, Prima gate fold album, and has lots of place sofr saying or photos to be added.  It has a latch and suitable to give to a male if you wanted.
It has lots of pockets and tabs. Everything supplied except your tape and glues.  See picture above.

12th March 10am-12.30pm Beach painting with Aly.
This is the first of many art classes we will be bringing you.
Using old Pallet wood, as a base, you will create a painted beach scene. This is a great way to learn the basics, with Aly, who loves to play with colour, including shading and texture.  We will have a picture up next newsletter. Learn to add your base, and then build up colour and shading to make your scene.

19th March 9am - 3pm 9 scrapbooking pages in one day $70.00
We will get 9 pages done, with lots of techniques to get your pages done.  We will do some pretty, sopme grunge and some in between. If you never get around to getting some pages done, then this is the class for you.
Everything supplied, except your tools, glue and tape. Photos to follow.

Phone 078897838 for bookings or email us on imagineif@xtra.co.nz


Well that is it from me, time to go and try and load some stock on the website, which is a great excuse to stay by the air conditioning.

Our new hours are up on facebook and on our website, but just a reminder that we are closed every Monday.

All the best for the week ahead.
Jo, Alysha, Pauline.