Wednesday, May 29, 2013

Canvas art using MDF Eiffle Tower

Canvas art using MDF Eiffle Tower

Hi everyone Jo here,  I know you probably thought I fell off the planet, but actually I have been so very busy with a few projects that it took awhile to get myself sorted.  But now I am back, and ready to go.  

This project today is using some of the new MDF wood shapes that Artfull Crafts are now stocking.  Unfortunately they are not loaded on their shop yet, however if you have signed up to their newsletter you will get to see when it has been done.

This project is using the Eiffle tower, and whilst I could have done it on it's own, I really wanted to have a play with it on a canvas. As I am still testing my mixed media likes and dislikes I thought I would try a few more tricks.  I had every intention of doing it in blues and greens and then I just picked up the pinks and blacks, don't ask why i have no idea.  I guess thats the colour she just wanted to be.

This is quite a big piece, about 50cm x 40cm.  I started with the Eiffel Tower and then just kept adding from there.  
I made sure to use lots of texture and interesting pieces, especially this earring that my mother n law was throwing out, above photo.

I just loved this saying, so it had to go on the canvas.  
 
and finally I thought I would add another project I did ages ago, with a Kaisercraft Eiffel Tower, which I just gave to my niece for her birthday.
  
So if you don't want to put it on a canvas, it still looks great all on it own.  Enjoy.  Check out the Artfull Crafts newsletter if you haven't joined yet, and also go in store and see what new products you can find.  I wish I was in Timaru, imagine the fun I could have then.  

Monday, May 27, 2013

Scrapbooking Multiple photos and Twiddleybitz overlays

Hi everyone, today we have a very bright page on the blog, and I do mean bright.  The photos are really busy and we had a lot of them.  This is my daughters 21st birthday, and the theme was around the world, and we had this amazing photo wall, where everyone had their photo taken.  So I decided that I needed to get as many photos on the page as I could manage.  It was also a Twiddleybitz challenge so here is my 15 photos and Twiddleybitz on a two page layout.

 
The colours well are a  little bright for me actually, and the layout is very very busy. I have used the Twiddleybitz rectangle overlay, which I cut into two parts.  I didn't really do anything else to that except colour them with distress stains.  I added a sort of Lei shape and covered in different coloured flowers,    and finally the hanging sign in the corner for another photo.  I also cut some photos down, but cutting around the people in the photo and tucked them in and around each other.  This was not everyone at the party, but it was her immediately family, and Aly's best friends, so I was glad to get it all on one double page spread.    

Who says us scrapbookers cannot get more than one photo on a page. 

Sunday, May 19, 2013

canvas art - Twiddleybitz products

Hi everyone and welcome to another late blog, this time I have been testing out some new mediums and paints, and trying a more metallic look incorporating lace, it was an interesting process.  I had a few broken pieces of jewellery that I wanted to use especially the Eiffel Tower, and I quite liked this new metallic paint that I found.  I finally finished this after quite a while of stalling, but it is finally complete.  I have used a Twiddleybitz chipboard Chandelier, and this amazing Twiddleybitz clock.  Unfortunately I am struggling to photograph it, as the bling goes crazy with a flash, and the medium over the top is also shiny.  So this is the best I can do.  I have to hang it as the jewellery down the bottom needs to hang for the photograph.   


I spent ages decorating the chandelier, with embossing powders, inks and pens and kindy glitz on all the pearl droplets. 

Enjoy the week


Tuesday, May 7, 2013

Scrapbooking - Love

Hi everyone, and a new page on the blog today using Twiddleybitz pieces.  Today I used secret admirer from Kaisercraft and of course some great chipboard pieces.  This layout of my sister and brother n law was a huge hit with my niece, she thought it was beautiful, which is great because it is going in her album. 


This page uses the lovely grape vines which I coloured and then added some green distress stickles to, to  add a little glitter.


 The chipboard key I embossed with a thick embossing powder, unfortunately it filled in the word that was printed on it.  So I cut out the word love and glued it on.  
I used a variety of flowers to add dimension, and a brad and a pin.  You can just see the hearts that I covered with paper, and tucked behind the flowers.  I love chipboard, it adds dimension so quickly. 
My friend is doing wire work,, and she made me this word love from metal wire, I loved it so I borrowed it for this project (thanks Lynn S).  I loved this heart doily that I finally go to use.  I hope you have enjoyed todays project.


Sunday, May 5, 2013

cards - High tea invitation

Hi everyone, on this wet afternoon in the heart of the Waikato.  I know you have probably wondered why I have been so quiet, I have been crazily crafting all over the place.  I have been trying heaps of different bits and pieces, different mediums and really just testing the waters on various things, and getting ready for SENZ in July.  I know July is ages away, but not when you have to write instruction for every crazy idea you have had for classes.  Especially one project, my friend Sue had to come over, and I made her follow my instructions, turns out the project was fairly easy once I had the instructions right.  So keep an eye out for my classes in Auckland this year.

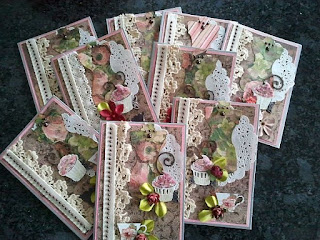
So today I have a card on the blog, yes another card.  Goodness gracious, I must be unwell.  So today I am posting for Twiddleybitz in Australia.  This card is for an afternoon tea I am hosting this week, and it is a compulsory dress and pearls afternoon.


This didn't end up being all of them, but I ran out of Twiddleybitz to put on them, so I had to make up a few with out the good stuff on them, let's hope none of them read the blog to closely.  

I started with a cupcake border which I cut up into individual cupcakes, and then proceeded to paint, and add flower soft, and glitter and some lines for the cupcake liner.  I hand stamped the teacups and coloured the pictures in.  


I added this stamped image inside the card on a small doily.  
So my invitations went out, now it is probably time to start thinking about what I am going to cook.  I can  promise you one thing, there will be sugar and cream.  Enjoy whats left of the weekend.