Sunday, January 20, 2013

Card - Iris folded shoe

Hi everyone, do you need to make a really special card.  How about trying Iris folding.  It's a great way to use up all of those scraps of paper that you like to hoard away.  Well I do anyway.

http://www.circleofcrafters.com/irisfolding/  I find this website great for patterns, and they have really good instructions on their site, in case you have never done iris folding before.  Also check out Twiddleybitz chipboard, they have lots of card making pieces, like these amazing chipboard flourish designs that have been especially designed for cards


This has an embossed white cardstock base, and then different shades of browns and pinks for the shoe itself.  A few pieces of Twiddleybitz for the laces, and for the back of the shoe.  I added a few pearls to give the holes definition, and a peelcraft "just for you".  A few flowers at the toe of the shoe and the back added some texture and height to the card.   The only think that I did, which really improved the card, was inking the inside of the shoe before I added the iris folds to the cardstock, also I added a small amount over the top of the embossed background, otherwise it was a little stark.  I hope you have a go at this, if you haven't already, it is a fun project to do, even though it looks complicated it is really quite easy.  

All the best


Saturday, January 19, 2013

Scrapbooking - You are Gorgeous


Hi,  I wanted to share this layout with you today.  I was really taken with this frame from Twiddleybitz, and I was really keen to use it with my new layout, as the theme for the school ball, was "in the garden".


But it just wouldn't fit.  So I decided to get a little creative, and cut it up.

 
With a little deconstruction I ended up being able to make this shutter type piece for the right hand side of the photo, and a sort of crown for the top of the photo.  I did quite a bit of fussy cutting of flowers, and added paper flowers, I embossed the leaves from the chipboard piece with embossing powder, and added this super cool bridge from Prima that I have been saving for this project.  I hung a few gold shoe charms on the right hand side, some pearls around the photo to finish framing it.  I used a punch for the green cardstock, and ripped the handmade paper for texture.  I hope you enjoy.   


Friday, January 18, 2013

Scrapbooking Page - Cousins

Hi everyone, this is my layout for Artfull Crafts using Botanical Odyssey.  This photo was taken at my Father n laws 80th Birthday.  The girls were all together which only happens a couple of times a year, if we are lucky.

I started with the Promenade paper, and very carefully cut out some of the butterflies and the middle of the paper.  At this stage I had intended to use the back of this paper as the photo mount.


I cut around the wings of the large butterfly on the promenade paper.  Then I adhered Lattice paper over the top, which covered all the holes that I had just made. I was then able to bring the bottom butterfly over the top of the blue paper.      


I then coloured in the cut out butterflies from the first paper.  I used distress pens, and added glossy accents to the wings.  I added the cut out butterflies, onto the ones on the layout using pop dots.

 
 I also coloured in any other butterflies that could be seen, and added glossy accents to those wings as well.


 Then I added the photo, that I changed my mind and decided to mount on Explore paper.  I added a few triangle stickers from the Botanical Odyssey Alpha sticker sheet  and spelt out Cousins, then cut some leaves from the large sticker with the flower on the Botanical Odyssey sticker sheet. 


I hope you enjoyed this project, check out all the products used on the Artfull Crafts website, just click on any of the links to take you there. 

Friday, January 11, 2013

Canvas - Lady in Botanical Odyssey

Hi everyone, and welcome to my first blog for Artfull Crafts 2013.  
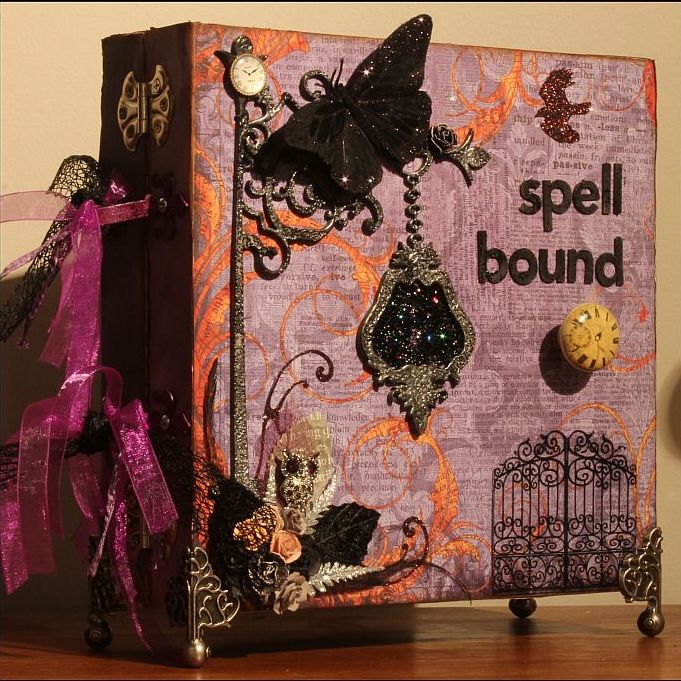
This project was created using the January release of papers from Kaisercraft, Botanical Odyssey, and the new stencils from Kaisercraft.  

The idea was taken from a book by Julie Nutting.  A very talented lady, and I have done this project a few times now. If you click on her name it will take you to her blog. 

What I used on this project:
Two identical black and white laser copied pictures of a lady in some sort of dress, short, long, evening, day what ever you like.
A canvas, size dependent on the picture you have photocopied, mine is very big 20 inches x 16 inches.
One sheet or more of a range of paper, (Botanical Odyssey of course)
Some paint, Glimmer mists or whatever you want to cover the background with.
Modelling compound, or gesso. 
Gel medium or glossy accents
Stencils Kaisercraft.
Printed or plain tissue or serviettes. 
Decorations, Collectables, glitters, flowers etc.

 Firstly I used some tissue scrunched up and flattened,  I used gel medium to adhere to the canvas.  I also had a few floral serviettes that I also adhered. I used some tissue from Tim Holtz with words printed on it.   I used the Modelling compound on the Kaisercraft clock stencil.  I added some muslin over the tissue to add some interesting texture.

This picture is not the one I am describing, but I wanted to show you what it looked like, I lost my data on my phone, so I redid this part to show you.    
 
  
 I painted most of the canvas with a cream paint (leaving some parts clear), and then sprayed glimmer mists all over the canvas. I used distress ink around the edges and over the clock to add extra colour, and the stencil I used down the top right and bottom right hand corners.

Then I cut out the lady from one of my laser printed pictures and adhered to the canvas using gel medium. This is why it must be laser printed, otherwise the ink would run on my canvas. 
I then cut out the second photocopied picture, but I only cut out the dress this time.  I turned it over, and put it on the back side of the paper that I wanted, like this:

Originally I had been going to use several different colours of paper to make the dress, but decided on one colour.  As you can see above, I cut the dress originally into three parts.  You can glue or tape this down before cutting out, or you can just trace it.  When you turn it over, you have a perfect replica of the dress.  Note I didn't like the way this dress finished, so I actually added a bit more to finish it off.  

Adhere that to the canvas using gel medium, also go over the top of the dress.  Now that the messy part is over, it is time to start decorating, and making the dress your own.  I painted the edges of the dress, and the folds.  I gave her hair a little colour using Distress pens. Once distress pens are dry you can gel medium over them.   I added the butterfly and the birds and cage and some of the flowers, from the Botanical Odyssey collection.  I used Kindy Glitz to make the butterfly more interesting, and some kaisercraft flowers.  I used glossy accents to adhere the necklace and earrings on.  I also used it on the bling, as the sticky will not stay on for long, especially in any heat.

I used rubons on rectangles of paper, making lots of fun words, that I thought might be appropriate for this lady.  I used a big swirl of Zva bling to add some interest to her dress.  I had this pleated white ribbon which I used on the bottom of the dress, it keeps pulling, so it will be interesting, and I used the cut off piece from one of the pages, which had more positive words on it, and hid the join of the fabric and dress.

I didn't mind the wrinkles under the dress, like normal fabric would have, if you didn't want that, you would have to ensure you didn't put anything on the canvas under the dress.

This is a great project for the younger girls in your life to do as well as yourself.  I have done this project with a group of 12 girls aged from about 6-11 and they all did a great job.  
 
I hope you are now inspired to start making something special.  Did you promise yourself that you were going to be more creative this year?  Then what are you waiting for?


Wednesday, January 9, 2013

Friendship Metal Card

Hi everyone, here is part two of my metal series using Twiddleybitz chipboard.  This card was made for a friend.  I wanted to make something really special, so I went to work.
Firstly I embossed a metal sheet, then I ran the sheet back though the embossing machine, with these three chipboard leaves under it, the embossing has been undone.  I coloured the sheet with alcohol inks, and adhered to cardstock.


I used gesso on the maple leaf, and layed the other leaf over the top, this made a pattern on the leaf.
I then coloured with alcohol inks.

I made this set of three tags using metal on the first, embossing and distress inks on the second, and then stamping this fantastic saying on another tag (a Darkroom door stamp) and inking the edges.


I used alcohol ink on a white gloss tag, then stamped it with adirondack ink (Darkroom door stamp).  I coloured the Twiddleybitz small chipboard frame with glimmer glam, and distress inked it a bit.  I glued the frame on to the tag.

Time to put it all together.

 A few embellishments to add some more depth to the card, roses, a bow, and some maple leaves. That is an acetate leaf in the background.

My finished card, I used Bobunny paper for underneath it all, and mounted the metal on to brown cardstock.  I sprayed muslin and tied it to the tag.  Then I had much pleasure giving my friend the card, and she loved it, she is also a crafter, and I knew that the time and effort would be appreciated all the more.


Tuesday, January 8, 2013

Scrapbooking - Autumn metal

Hi everyone, I know summer is here, but I finally got around to doing this page, that I have been thinking about for over a year.  I wanted to use metal and the autumn photos I had of my daughter Sam when she was little.

 This page was created using metal that I coloured coppers, browns and oranges.  I embossed the sheets of metal in the cuttlebug, and then coloured using alcohol inks, then cut them into strips and placed them around the page, keeping a fairly straight forward pattern.

From here I coloured a Twiddleybitz frame with glimmer glaze, and glimmer glam.  The frame which is 6x6 was adhered to a piece of bazzill cardstock which I cut in half, and then folded in half again, I then used gaffer tape to adhere another piece of card, which gave me more pages, and then I decorated with a piece of Bobunny  paper that I have been saving for this project. I decided three pages was enough, and ended up cutting the final piece of cardoff, and making a small photo tag on top of the final photo.  


This way I managed to get 4 photos onto the page.  I added a tag with the word autumn to pull the pages open.  I then coloured muslin with glimmer mist for a sort of ribbon embellishment, and then added some Angelina leaves which I cut using sizzix tattered leaves die, also some acetate coloured with alcohol inks and die cut.  I added prima roses, and some paper leaves and finally some bling to finish the page off.       

 Can you see the leaf at the top of the picture with the pearls on it, this is a Twiddleybitz maple leaf, which I covered with Gesso and allowed to dry.  I layered one of the other leaves in the packet over the top, which gave me a great imprint on the leaf, when it was dry I covered it with alcohol ink in various autumn colours. 
As you can see they look pretty realistic.  I only used a few pieces on this project, I made a friend a card, and you will see that in a couple of days time. 

I hope you enjoyed this project. 


Tuesday, January 1, 2013

Spellbound project

Hey everyone, happy new year.  Welcome to 2013.
My first project was made after I had been to Melbourne, I had been trying to decide on my next creation for a little while.  I went to a cute little shop called "Spellbound" and saw some neat stones, crystals and decided that I wanted to make something a little different.

This project uses two 12x12 canvases that I hinged together, and added some feet to make it stand up. 
The paper is from Creative imaginations, that I have had for a few years.  I never wanted to use it, until I decided on this project.  I used a Twiddleybitz lamp post.  Firstly I painted it black, then I added silver embossing powder, and then stamped into it, to add texture.  Then I sanded it a bit.  The inside of the light I wanted to make it look like a looking glass or something a little ethereal,  I added red paint, and then black Kindy glitz.  The gate is acetate, and the little owl is from a jewellery piece that I recycled.

 A few flowers, stickers and leaves to finish the bottom of the project off.  I had originally planned on just using grunge board hinges, to connect the two canvases, so I die cut, painted and hammered them on, however they were not strong enough, so I added the ornate hinges.  I then had two leather like straps that seemed to be sticking out of nowhere, so I added all the ribbons.


The canvas was covered in Gesso, and then I stencilled the bricks on, and then painted over some of them.  I wasn't trying to make it perfect, more of an impression.  I then added balsa wood around all the edges and made the shelves which I painted.  I then starting adding, little stones, and crystals, jars and other little things that I had lying around.  The books on the first and 2nd shelves are hand made, including, all the little pages inside.    The top left black corner is a Twiddleybitz piece.  The purple vase on the far right of the bottom shelf, is the bottom of the lamp on the front cover, that I couldn't fit on. The cauldron is made from a measuring cup, that a friend made for me, when I couldn't find one that would fit.   


The Twiddlybitz cabinet, was the main piece I started this project with.  I painted it, and then filled it with a playing card, and some jars and other pieces, I wanted to use a key on the project and what better place, than to lock the cupboard.  So I hope you were spellbound. 

May 2013, be everything that you could hope for.