Wednesday, January 9, 2013

Friendship Metal Card

Hi everyone, here is part two of my metal series using Twiddleybitz chipboard.  This card was made for a friend.  I wanted to make something really special, so I went to work.
Firstly I embossed a metal sheet, then I ran the sheet back though the embossing machine, with these three chipboard leaves under it, the embossing has been undone.  I coloured the sheet with alcohol inks, and adhered to cardstock.


I used gesso on the maple leaf, and layed the other leaf over the top, this made a pattern on the leaf.
I then coloured with alcohol inks.

I made this set of three tags using metal on the first, embossing and distress inks on the second, and then stamping this fantastic saying on another tag (a Darkroom door stamp) and inking the edges.


I used alcohol ink on a white gloss tag, then stamped it with adirondack ink (Darkroom door stamp).  I coloured the Twiddleybitz small chipboard frame with glimmer glam, and distress inked it a bit.  I glued the frame on to the tag.

Time to put it all together.

 A few embellishments to add some more depth to the card, roses, a bow, and some maple leaves. That is an acetate leaf in the background.

My finished card, I used Bobunny paper for underneath it all, and mounted the metal on to brown cardstock.  I sprayed muslin and tied it to the tag.  Then I had much pleasure giving my friend the card, and she loved it, she is also a crafter, and I knew that the time and effort would be appreciated all the more.


Tuesday, January 8, 2013

Scrapbooking - Autumn metal

Hi everyone, I know summer is here, but I finally got around to doing this page, that I have been thinking about for over a year.  I wanted to use metal and the autumn photos I had of my daughter Sam when she was little.

 This page was created using metal that I coloured coppers, browns and oranges.  I embossed the sheets of metal in the cuttlebug, and then coloured using alcohol inks, then cut them into strips and placed them around the page, keeping a fairly straight forward pattern.

From here I coloured a Twiddleybitz frame with glimmer glaze, and glimmer glam.  The frame which is 6x6 was adhered to a piece of bazzill cardstock which I cut in half, and then folded in half again, I then used gaffer tape to adhere another piece of card, which gave me more pages, and then I decorated with a piece of Bobunny  paper that I have been saving for this project. I decided three pages was enough, and ended up cutting the final piece of cardoff, and making a small photo tag on top of the final photo.  


This way I managed to get 4 photos onto the page.  I added a tag with the word autumn to pull the pages open.  I then coloured muslin with glimmer mist for a sort of ribbon embellishment, and then added some Angelina leaves which I cut using sizzix tattered leaves die, also some acetate coloured with alcohol inks and die cut.  I added prima roses, and some paper leaves and finally some bling to finish the page off.       

 Can you see the leaf at the top of the picture with the pearls on it, this is a Twiddleybitz maple leaf, which I covered with Gesso and allowed to dry.  I layered one of the other leaves in the packet over the top, which gave me a great imprint on the leaf, when it was dry I covered it with alcohol ink in various autumn colours. 
As you can see they look pretty realistic.  I only used a few pieces on this project, I made a friend a card, and you will see that in a couple of days time. 

I hope you enjoyed this project. 


Tuesday, January 1, 2013

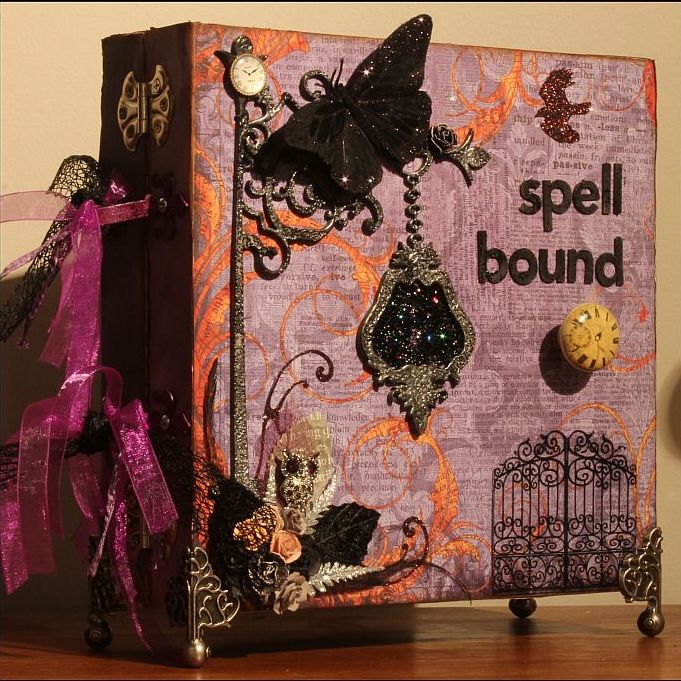
Spellbound project

Hey everyone, happy new year.  Welcome to 2013.
My first project was made after I had been to Melbourne, I had been trying to decide on my next creation for a little while.  I went to a cute little shop called "Spellbound" and saw some neat stones, crystals and decided that I wanted to make something a little different.

This project uses two 12x12 canvases that I hinged together, and added some feet to make it stand up. 
The paper is from Creative imaginations, that I have had for a few years.  I never wanted to use it, until I decided on this project.  I used a Twiddleybitz lamp post.  Firstly I painted it black, then I added silver embossing powder, and then stamped into it, to add texture.  Then I sanded it a bit.  The inside of the light I wanted to make it look like a looking glass or something a little ethereal,  I added red paint, and then black Kindy glitz.  The gate is acetate, and the little owl is from a jewellery piece that I recycled.

 A few flowers, stickers and leaves to finish the bottom of the project off.  I had originally planned on just using grunge board hinges, to connect the two canvases, so I die cut, painted and hammered them on, however they were not strong enough, so I added the ornate hinges.  I then had two leather like straps that seemed to be sticking out of nowhere, so I added all the ribbons.


The canvas was covered in Gesso, and then I stencilled the bricks on, and then painted over some of them.  I wasn't trying to make it perfect, more of an impression.  I then added balsa wood around all the edges and made the shelves which I painted.  I then starting adding, little stones, and crystals, jars and other little things that I had lying around.  The books on the first and 2nd shelves are hand made, including, all the little pages inside.    The top left black corner is a Twiddleybitz piece.  The purple vase on the far right of the bottom shelf, is the bottom of the lamp on the front cover, that I couldn't fit on. The cauldron is made from a measuring cup, that a friend made for me, when I couldn't find one that would fit.   


The Twiddlybitz cabinet, was the main piece I started this project with.  I painted it, and then filled it with a playing card, and some jars and other pieces, I wanted to use a key on the project and what better place, than to lock the cupboard.  So I hope you were spellbound. 

May 2013, be everything that you could hope for.
  

Friday, December 21, 2012

Scrapbooking layout - Live in the sunshine

 Hi everyone this is my first layout for the Twiddleybitz design team that I am on for the next three months.
 This layout of my beautiful daughter Alysha getting a sneak kiss from her boyfriend Jason.  I love this photo and I wanted it to be very special.  I loved the Twiddleybitz surfboard chipboard piece.  I just knew what I wanted to do.  .

Firstly as this is a hollow surfboard, I filled it with modelling paste, and when it was dry I covered it with some cream paint and then crackle medium.  Once it was dry I added a small layer of gel, and sprinkled with sand.  I then coloured the rest of the chipboard with distress markers.  I added flowers, starfish, and some film strip. 


 I used pieces from the grab bag to make the squares under and above the photo.  The little birds are chipboard pieces as well, and I covered with a little ink.  I found the bead when I was on the floor looking for the bird that I dropped,so it seemed appropriate to add it to the page.  You will soon find out I love clocks, and I put them on every project I do these days.  The photo actually has a piece of acetate over it, which had these awesome swirls on it
 I hope you enjoyed this post, and please click on the link above to take you to the Twiddleybitz ning for lots of fantastic ideas. 

Thursday, December 20, 2012

Abstract frame

Hi everyone, Merry Christmas, as this is my last post for Artfull Crafts before Christmas is upon us.  No snow again this year; I am forever hopeful.

I was quite taken with the Forget me not collection that I received for my next challenge.  I decided that it would be the basis of my next off the page challenge, Abstract memory frame.  Great news for you though, it is on special at Artfull Crafts, so make sure you click on the link, and go and add one to your cart! 

As you can see it is pretty involved project.  I didn't want to put photos in it, I thought it had more possibilities as a quote display board, one of my last presents to make.  I painted the board edges first, and although you cannot see it here, I used metallic copper paint, on all the edges and then Kaisercraft paint on the top 

I started using the Forget me not paper collection, Which I measured and cut to fit all the different boxes. 
Then it was playtime. I had all the wooden embellishments in my stash from SENZ, I also used resin embellishments that I made,  Kaisercraft blooms, a variety of stamps, some bling, and Kaisercraft tags.  I stamped using black ink, on left over bits of paper, and then matted those on brown card stock.  I also used quite a few items from Kaisercraft collection embellishments.  I also used a few dies for making embellishments such as the Sizzix bird and cage, and the dress from the sewing room set.  
I have taken a photo of each section, so you can see what I did.


I hope you have enjoyed, and thank you for stopping by. Thanks for all the great comments.
Merry Christmas to you and your family, and I hope that 2013 is wonderful and of course full of great crafting opportunities.   


Tuesday, December 11, 2012

4 Christmas Tags

Hi everyone, whats on the blog today? Christmas, no surprise there, but it it that time of the year.  So today is about tags... 4 of them actually, and embossing powder, and resists.  I decided it was time to try using some of this amazing embossing powder, that has been around for awhile, so tends to be put away, while new products are in favour.  But I love it, there are so many colours, and textures, you have got to try it out.

Embossing powder can be used to colour a product (I love old gold), it can be used to distress (distress embossing powder) and then it can be used as a resist (any colour but I do like clear powder for this)

The picture on the left uses clear embossing, the one on the right has been embossed twice. 


Left hand side:
I then used distress ink on the tag to colour it.  Note that where I embossed the words at the back, the distress has resisted it, also the red reindeer.  I useddistress embossing powder for the lamp, some stickles and a graphic 45 images. The lamps have stickles in them to look like the light lights are on.

Right hand side, Tag 2 has been embossed with distress embossing powder, and then the lamp was gold embossed, but I sanded it a little bit, to grunge it a little bit.

In this image, on the left I have stamped Santa with black ink, then used a white crayon to colour in all the places I wanted to stay white, so I could colour the rest of the tag in. 

Time to add a few embellishments.  Tulle, berries twigs and a Bobunny metal embellishment.   


For this tag I stamped the background, and then
coloured Santa with crayon again.
I also coloured the holly on his head with
distress markers, and then inked it very softly
with pale distress inks. 

I enjoyed making these little pieces for Christmas, and what a great thing to put on your thoughtfully purchased or made gifts.  I hope you have enjoyed these.  Please comment so I know how I am doing with all my instructions and projects.  Thanks for reading. 

Thursday, December 6, 2012

Snowman Hat

Hi everyone Jo here.  December is here and the Christmas countdown is on. This project is for Artfull Crafts table settings week.  I have always thought that snow at Christmas time would be wonderful, well, for a few hours anyway.  Making a snowman looks so much fun, but as that isn't going to happen this year in New Zealand, I decided a snowman's hat would be the next best thing for my Christmas table (actually for another friend of mine's table).

I started with a coffee tin, (no I don't drink that much coffee, I got it from a large business in town).  I covered the tin with BoBunny paper, I liked the black and white look. I also covered the top of the tin.  I cut this window from a Cottage Cutz die that I have had for a while, however there are lots of neat window dies on the market now, including two new releases from Spellbinders.  I adhered the cut-out window on to thick acetate, I then scored and creased the window panes, so that the window had dimension.  I decorated with Peelcraft stickers. 

 I used Graphic 45 paper behind the window to show a scene through the window.  I then cut a large circle from black card and adhered to the bottom of the tin, to make the brim of the hat. I then added baubles, pinecones, tulle, graphic 45 tags, poinsetta flowers, berries, leaves, ribbon, and a few branches.

    
  I used the window and peelcraft on a card as well.  So these windows have lots of uses. 

I hope you enjoyed the project.