Sunday, March 31, 2013

Scrapbooking page - Remember

Hi everyone Jo here with a layout for Artfull Crafts using  In the Attic from Kaisercraft.  This is a photo I took on a family trip, it was so relaxed that I really wanted to use it for this page.  


The stripes piece is Coat rack, the brown back page is Ornaments, and the brown and white is photographs.
I have also used some Collectables for the birds and also the Sticker sheet.   


I had some left over Kaisercraft brads from an old range that worked perfectly and some Kaisercraft lace.
I layered the edge up with stickers and the lace to make a real textural edge to the page.  I added a few flowers and some pearls to finish the look.

I added a few resin flowers to the page, and these tickets, and there is my trademark clock.

I hope you have enjoyed this layout.  In the attic, is a fun collection, so have you got yours yet?
  

Saturday, March 30, 2013

Scrapbooking - Make time 4 what U love

Hi everyone, and Happy Easter 2013.

Today I have a page for Twiddleybitz, and it is of me.  Yes I know shock horror and all of that.  A photo of me is so rare, as I am usually the one behind the camera.  I had this black and white photo of myself that my daughter Alysha took.  I thought it was about time, I had a page in our family album. So I set myself a goal, No colour, that's right, NO colour.  Okay well I don't count cream and black for this challenge.

I have chosen Teresa Collins paper, I like the thickness of this paper, and I knew that what ever I wanted to do to the paper, it would hold.

If you know me, you probably know that I am a keen on photography, and I have just started a photography course.  So I am learning to make time, this is where the layout for the page came from.  

 I love this clock from Twiddleybitz, which I covered with stain, and the embossing powder, a little bit of Kindy Glitz to finish it off. 

This Paris gate symbolises the things I have to get through, to get time for my hobby. 
I decided to really play around with lettering, and this beautiful Prima branch and love word, that I had been saving for the perfect layout, and I decided it should be on my page.
I really liked this key from Twiddbleybitz with the word love on it, and I wrapped a little bit of Tim Holtz film strip around it, not that I use films anymore, as I am all digital, but it will always represent photography to me.  So make time for what you love.  I hope you like the page. 

Tuesday, March 26, 2013

Hot air balloon

Hi everyone, and welcome to one of the hardest things I have ever done.  I think it is a good thing that I am stubborn sometimes, because this was a nightmare.  I have never just about driven myself insane before, but this project just about did it. 

I started with a Twiddleybitz shadow box, and built my project up from there. I have also used Twiddleybitz mini houses, mini house windows and doors, swirls, autumn leaves, and floral border on the balloon. The balloon is a large bauble I purchased at Christmas time, then I covered with tissue and lace, and then beaded a net over the whole thing.  Actually I beaded it four times, I just kept making mistakes with the quantity of beads to thread on, and holding and working on 12 strings at any one time. 


So was I crazy to attempt it? yes am I glad it is done Oh yes definitely.  Will I do another one? never.  But still someone special will enjoy this project I hope. 

Wednesday, March 20, 2013

Finding Inspiration

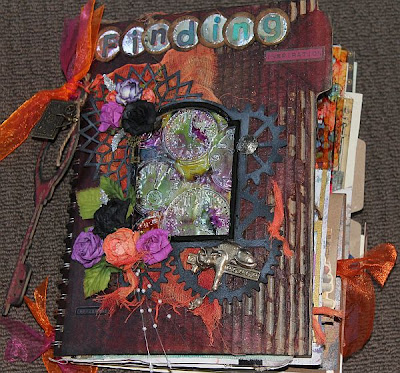
Hi everyone, here is my latest project for Twiddleybitz in Australia.  I decided to make myself this inspirational book, just for those days when I am feeling a little uninspired.  It was also a good chance to play with a few ideas and colours and....well you will see. 

I made myself a few rules, look at every one's beliefs, different cultures, colours, thoughts, religions, poems, and ideas. I am not sure why I can look at a picture of a rose and decide to make a hot air balloon (oh is that what you have been working on Jo), it is just the way my brain works.  Having travelled around the world, I have met and talked to a lot of people, and I am always interested in what makes each person believe in what they believe, and what makes them happy and be able to lead their lives in the manner they wish.  So I have taken a lot of those things, found them on the Internet and then printed some pictures out, and then made up a page.  I have looked at all sorts of things from religion, to healing properties of stones, tarot cards, nature (plants and the moon), therapy of games (Sudoku mad) and the meaning of colours and the colour wheel, I headed to the dark side (ooh), and then into the land of fairy tales.       

I will not show all of the pages, but I will show the pages where I have used Twiddleybitz chipboard products.  I also set myself another challenge as I like to do, there is a clock and a key visible on every double page when the book is open, this was quite tricky as there is over 50 pages or inserts in this book. 


Okay here we go, for the cover I have used Steam punk clock frame, which I painted with distress stain, then I sprayed graphite glimmer mist. I sprayed muslin to get the fabric, and I used flowers for dimension and then my mother n law gave me this cat and mouse broach for the book.   

 The book was from a range called naked books, I started with the cover cardboard, I distressed it, inked it, and stained it.


I embossed some metal, and coloured it with alcohol inks.  


 I put the Twiddleybitz chipboard on, then decided to paint the black strip around it, to make it stand out.
 This is my title
the flowers and some decoration.

the back of the book.


The side of the book, was a Christmas key, I cut out the centre and I wrote this saying on it,
Knowledge is a treasure but practice is the key to it.

It's ONLY imagination, I used this lovely skeleton tree large  on this page.


I sprayed the canvas with cogs
 to make this page on the right and then used the spray cogs on the left.


 The chipboard spider web and a Paris gate were used on this page above, and I also used some ferns, which I cut to fit.  

 I sprayed a piece of fabric tape with glimmer mist using this Twiddleybitz stand as a stencil
then sprayed it again to get the 2nd colour


I used the light bulb on the page on the left, and a left over frame on the right. 


For this page on the right I used the frame from the Xmas pack to make my tarot page.
and for the elements page I made the same frames into candles (down by the fish).   I also used square mini ornate frames on the tarot page. 


My love of cats had to be in this book somewhere, so I decided to make this page below


I looked for anything that caught my eye  


 I can't even begin to tell you how much fun I had making this book.  It was a labour of love for me, and opened my eyes to how my brain works creatively.  I hope you get a chance to make one of these books, just do what ever you want, use up that stash of pictures or paper you have been hoarding, and those little odd bits and pieces that make you smile.   Have fun.


Wednesday, March 13, 2013

Scrapbooking page - memories

Hi everyone Jo here with a layout using 75 cents, available from Artfull crafts, 75 cents is probably my most favourite paper from Kaisercraft.


I decided to start with ripping a large shaped opening in the middle of my page, and then I built up the page from there.  My daughter and my mum were both in black, and so I wanted to keep the colour going through the page.  I mounted the photo using the black sheet from the 6x6 pad, and then used a few collectables from the same range to add some dimension.  

I made the flowers using Sizzix tattered floral die, and used Kaisercraft large brads in the middle, I inked all the edges. I used jute ribbon to add leaves to the flower. I added a bit of bling for a softer feel.  I made this little brad and ribbon embellishment on the edges.  

 Finally I added this little clock and memories word.  My daughter loved the page so much that she stole it for her pin board at university, so it must be okay.  I hope you enjoyed today's post.  Don't forget to comment.  All the best for the week.     

Monday, March 11, 2013

Scrapbooking - Dream big

Hi everyone Jo here with another project for Twiddleybitz in Australia.  I loved these photos of my niece, who is usually quite reserved, but I was pleased when I got this lovely photo of her really laughing. 

I used Bobunny paper from Isabella collection.  I used a Vintage chipboard overlay which I sprayed bright pink, but then added some purple Dylusions spray to tone it down a bit.

The hearts are chipboard covered in paper, and the sticker is put inside a chipboard frame, from the frame multi pack, which I sprayed pink and left it pink.  


The little bird is from the Christmas pack, and I have covered it in paper as well.  I sprayed all the gauze in
the layout with dylusions spray.  I hope you like the layout.  Helena thought it was cool, so I guess that means I did a good job.  Catch you soon.    

Saturday, March 9, 2013

Off the page - The brick wall

Hi everyone Jo here, here is my post for Artfull Crafts today.  I was sent this Fence and heart from Liz, and I have to say it really made me work hard.  I had originally decided to completely change it's whole structure and turn it into an abstract frame, but then I started thinking about all the wonderful things that this fence could mean to me.

A fence can stop people getting in, they can protect you, but they can also stop you from getting some where.  Then I found this really cool saying in my stash of quotes,

This is a brick wall.
It’s in your way.

You can climb over it.

Or tunnel under it.

Or kick it down.

or walk around it.

or Try and find a gate,

Or you can sit down

and weep life is not fair,

wall hating tears.


But let’s be honest:

When you cry, your mascara runs

And so does your nose.

And your eyes get red and puffy

And when you are done

That wall will still be there.

In your way.


But the choice is yours.


This is where the project begins:
I painted the fence sides in black paint, and then covered with paper from the Kaisercraft 75-Cents paper collection called sixpence.  I made these flowers from 75cents 6x6 Paper Pad using the Sizzix Tattered floral die, and adding some other Kaisercraft flowers.  I already had these felt brown leaves, but I decided on a few green leaves for a fresh feel.  


I cut out some Sizzix branches, and put some (yes it is still wet) glossy accents onto some butterflies.  I added this bird from Prima Marketing, but you could make your own out of resin.  I decided not to colour it, as I didn't want it to become that important on the project.   


I printed my poem onto  Kaisercraft Bricks paper from Base Coat collection and added some of these Kaisercraft Wooden Flourishes Borders on the top and the bottom of my poem. 


I added some cute hinges, some jute ribbon.
  
So here is my finished project. If you like the poem, feel free to copy it, and maybe you can use it in a journal page or make your own brick wall.  Enjoy.   


Thursday, March 7, 2013

Home Sweet Home card

Hi everyone, I am not really a card maker, I am not really sure why.  I just find them really hard to do, yet I like working with small things, just not cards.  Still here is my attempt for Twiddleybitz this month.

I started with a Twiddleybitz door, and inked it with distress stain.  The back brick paper is from Kaisercraft 75cents range.  I then used a sheet of acetate  which I coloured with alcohol inks.    I then added hinges to my door and frame, (tiny little ones) and then adhered to the card.  I then put the acetate behind the door, to make it look like a stained glass door.  I used this little metal basket from Jolee's Boutique and then added a Twiddleybitz vine to the door.  I added a few roses, and the cat.  I then made the little wreath from chipboard Autumn leaves.  I inked the door handle and lock gold.

When you open the door, you can see the brick wall better.  I added a few sticker hearts and I covered the edges of the acetate, with paper. 

I then made this cute little wreath for the front door from Autumn leaves.
I made a circle and then carefully arranged the leaves, and then adhered the top leaves over, and then when dry I took off the circle and glued in place.  (sounds easy, no I made a few mistakes, I picked it up wet, and it fell apart.  So I had to make it again)  


Here is the finished card. 


I hope you have enjoyed. 

Saturday, March 2, 2013

Mixed media - Live a Beautiful life

Hi, and welcome to another hot, sunny and very very dry day here in New Zealand.  Today I am showing you one of my new projects that I have been playing around with.  Mixed media.

I decided that it was time that I just stopped talking about it in my own head, late into the night, and just get it on a canvas.  So I am pleased to show you this.

This is my first real attempt, at stop thinking to hard, and just go with the flow.

I am not going to give you  step by step instructions, as this is very much a piece that I really did all the wrong way around.  I learnt heaps and am looking forward to my next attempt.   I have used quite a bit of Twiddleybitz again for this project, the grab bags for the squares, the cogs, and the lightbulb (cut up and changed around) are all chipboard. As is the Live a Beautiful Life.


I used Graphic 45 paper, as a starting point, and then cogs, and the Live a beautiful life, were a great way to add my words and texture.  I hope you have enjoyed.   


I used heaps of buttons.  Plain and metal, paper flowers, and bling.