Saturday, June 29, 2013

Magic is believing - using a shadow box from Twiddleybitz

Hi everyone, the sun is shining and it is a beautiful day here.  I have a young friend who is having a birthday soon.  So I thought of her when I made this shadow box.  It is a 6x6 size, and really easy to make.  Twiddleybitz have photos and instructions with all their projects like this.  Which is just as well, because I do not do instructions very well.

Picture of BUT006I wanted to do soemthing very girly and soft looking.  So I started with gesso and I covered the whole box in that.  Then I used distress stains picket fence to give it a coat of white as well.   I then used alcohol ink on a sheet of white gloss card and made some beautiful colours.  I then traced some Twiddleybitz butterflies out and cut out the shapes of their wings from the coloured card.  I then adhered the card to the backs of the butterflies and then added more ink to the fronts of the butterflies.      
I stamped on to a doily, which was fun, I left a 2nd doily attached to 1st, as it was very see through and the small pattern on the back paper was coming through.  Some flowers and some bling were then added.  

I then added some muslin, a key, and some chain.  You can just see the left over prima packaging behind the chain, printed thick plastic was a great backing to add more butterflies below the main box.

So here it is - Magic is believing   I think she will love it.  

All the best and have a great day. 


Wednesday, June 26, 2013

Scrapbooking - A moment to remember

Hi everyone, Jo here with a post for Artfull Crafts, and using Enchanted Garden, the new release from Kaisercraft.

As soon as I saw this range I knew I just had to have it.  I have managed to make three projects with my kit.  The first of the projects is a layout of my daughter when she was little.  Enchanted garden is released in July, so it should be in store any day now.


I loved the pretty pink colours in this page, but with the hint of greens and some red/orange as well it was really easy to add other colours in.  I had the die cut page, which I matted with a green card stock to give it more definition.  This is the third project I did, and I had used most of my stash on the others.  So it was a matter of adding bits and pieces to make the layout.  I used some Prima flowers, as well the resin mushrooms.   I added in some fairy floss ribbon roses from Kaisercraft.  I added some Zva bling, and then some extra Kaiser rhinestone.

Finally I added a few other flowers and embellishments, and some white  feathers to soften the page.  

Enchanted garden, definitely a favourite of mine.  . 

Monday, June 17, 2013

Scrapbooking with those left over pieces

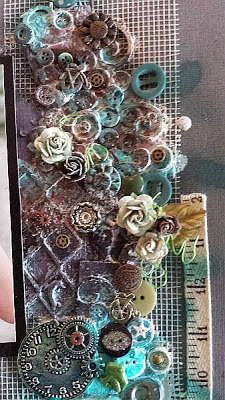
Hi everyone Jo here, with a page for Twiddleybitz, using all those left over bits and pieces.  I am definitely a hoarder when it comes to chipboard scraps.  I never throw anything away, what might be packaging for some, is definitely must keeps for me.  I also collect buttons, I never throw out a button if I am throwing an old shirt or something away.  But just for the record, crafting supplies is all that I hoard, the rest of the house is totally tidy and nothing is kept just in case.    I love all the frames that hold the chipboard in place when you purchase it.  So for this layout, that's what I started with.

I used some left over plasterers tape from when we did a house renovation, I put that on the page.  Then on the left hand side I used a frame from a Twiddleybitz grab bag.  I also had a piece of chicken wire chipboard as seen on the bottom of the photo below, form a double page layout challenge, that I had to cut off because I just couldn't get anymore of on the page. You can see some flourishes and swirls in amongst the buttons.  

I also had some other pieces of chipboard cut offs that I added to the mix.  I glued it all down, and then layered buttons over the top and round it.  Sometimes you end up layering over the top of your chipboard, but it all adds to the height and the look. I also had a few embellishments like the plastic car button that I added to the layout.  


There are a couple of squares again from a grab bag just up from the clock and to the right, and more flourishes and bits and pieces,  I then sprayed it all to give it a good colour.  I started with the brown, dried it off and then added some blue to lift the page.

I added this lovely clock in, and the little green frog and the tape measure strip that I had left from another project.  I added some metal looking buttons and then decided a few flowers to add a bit of texture.


Finally I added the key and the words cherished and lovable. So this is my page dedicated to left overs.  
So don't throw all those little chipboard gems away, use them on your layouts.  If you make a leftover layout, tell us about it. Load it on to the Twiddleybitz ning, we would love to see it.  http://twiddleybitz.ning.com   


Sunday, June 16, 2013

Scrapbooking layout - How my brain works

Hi everyone, on a wet and somewhat sad Sunday, here in the mighty Waikato. Today I wanted to show you how I go about tryignt o make a layout work.  Everyone says it is alright for you, you just do it, and it works.  Well no it doesn't sometimes, it doesn't come out at all how I had intended.

So here is a photo show of what I did step by step to make this layout.

Step 1: Twiddleybitz rectangles
  I started with some printed tissue, which I stuck down and then adhere the photo with tape.  I then added the rectangles, and then this very cool birdhouse, and then a left over piece of clock that I put at the top of the photo and then the flourishes on the right.  I had every intention of putting the buttons all over the place, and making it mixed media.  But then this pattern sort of emerged, and I was seeing where it was going.

Step 2: Add some colour

The page has these green stripes in it, so I thought I would start with some greem and then add some blue to match his shirt.  I added the brads to make the flowers stronger looking.  Hmmm.

Step 3 Add some more to the age, a clock and this brown flower.


 Not sure this is working for me, it seems  a little dull, and in need of a wham.

Step 4: Pick out what you like and build it up from there.

This part is working, I like the layers and I love hte saying.  Possibilities begin with imagination.

Step 4:  Not happy. what is wrong? It needs colour, so remove the photo and spray the background.  Oh darn.  Not that colour. 


 Yes I changed the photo, I sprayed lime green and brown and it was totally wrong, so I changed the photo, added a few more flowers and some bling.  My boy page, suddenly a girl page.  All good.  So that is how my brain works.  Have a good day.   


Thursday, June 13, 2013

Scrapbooking - Porcelain Rose - Forever

Hi everyone Jo here with another layout using Porcelain Rose paper form Kaisercraft for Artfull Crafts. It is a really versatile paper, I love the black and white look that comes with this paper.  It was sharp and clean, so I decided my layout had to be that as well.

I started with black cardstock, and then just laid half a sheet of the music paper down, and then I used a few bits and pieces that I had sent to me from the same collection, I just cut them into rectangles and started to layer them around. 
I didn't ink any edges today, I kept the paper sharp (no distressing at all).  This kept the page sharp looking.

These flourishes I just inked with distress stain, and a Prima flower vine was added over the top, and I added an extra Prima flower in just to bulk the centre up a bit.


I even used a few left overs from other packs.  The rubon girls at the top of the layout and the word forever, the clock and the key were from other collections.  So my sharp no fuss layout using Porcelain Rose from Kaisercraft. I love this paper.  

Monday, June 10, 2013

Steam Punk Train

Hi everyone, I hope this winter weather is treating you all well, and keeping away form those winter chills that get associated with this time of the year.

Today I have something totally different for you, a gift I made for someone, but I have decided to send it back to Twiddleybitz to take to their shows that they attend.  Hopefully I will have it back for Christmas to give to him instead.

 This is my train, that I grunged up and made a little steam punk.  I wanted something tough and not babyish, so it was a matter of just adding bits and pieces until I had the look I wanted. 

So for the side of the train, I silver leafed the top of the steam funnels, I added a silver metal which I embossed with gears and then I added black ink over it, and then I added the clock mechanism from Twiddleybitz that I cut down.  I also added extra cogs and metal embellishments. I still wasn't happy so I added the chipboard barbed wire pieces across the sides.  I added the knob to the place where the carriage joins the train.  A clock winder out the top, finished the train.


The front of the train I had a metal clock, but then I added this chipboard light bulb with cogs, then I added a metal piece from my husbands shed, and screwed It through the front wall.  I added some broken peg parts to make a cattle mover in the front and added a spring to join them together.  I then added the Graphic 45 metal piece down the front as well.   We found these light bulbs for the carriage top, and I added some chain which you cannot really see across the top as well.  

So my steam punk train is finished, and I have to say probably one of the best pieces I have ever made from my point of view.  If my husband had his way we would have had laser lights and a cannon on it as well.  Luckily he went away for a few days so i got it finished with out him.  Still he thinks it is cool, so I guess I must have done something right.   


Thursday, June 6, 2013

Scrapbooking page - Porcelain rose

Hi everyone, Jo here with the beautiful Porcelain Rose collection.  from Artfull crafts.  I was really impressed with this collection, and I had the perfect photo to go with it.  My friend said "Jo sometimes you should just do an easy page, so that I can just copy it.  Mmmmm well okay, I could do that.  See I think they are all easy, but I do get not everyone likes to fussy cut as much as I do.


For this page, I had the die cut page from Kaisercraft, Porcelain Rose Ivy, I adhered to the Cardstock, and then left the picture unmounted, but I did go back and add a touch of lace to the bottom of the picture.
I then built up the flowers on the page, with a ribbon.  The green leaves were die cut and sent to me.  I actually really like the die, and I used half on here and the other half on my 2nd layout, which I will share next week.  I added a couple of die cuts from the collectables collection.  


The words were from the Heirloom page.  I inked around them and added foam dots to make them pop.


I think these words are perfect for my Mother n Law and Sister n laws photo.

Lastly I added a couple of bling brads to the top and the bottom of the page.

I hope you have stocked up for the winter ahead, and Porcelain rose is the perfect place to start.  

Monday, June 3, 2013

Scrapbooking - Multiple photos


Hi everyone, after a few days of cold weather, I thought it was time, to put a chill on a page.  I had some really cool snowflakes from Twiddleybitz, as well as an awesome Eiffel tower. I remember we spent New Years day in Paris, as I wanted to see a white Christmas.  It was really really cold, but that was part of the fun.

I decided to use some hot glue, something I normally wouldn't do.  I then sprinkled diamond dust onto the hot glue and got these raised blobs for want of a better word, on my snowflake and down the Eiffel Tower.   

I dribbled hot glue on my craft mat, and then made these dripping icicles, I then put diamond dust on when they were still hot, and once set (2 minutes) I hid them under the flowers.

I added this name plate along the bottom for my word Paris, which i admit I put on crooked, but it ripped when I went to take it off, so I figured it was meant to be like that.  So my cold in Paris page is done.